
 iPhone Data Recovery
 iOS System Recovery
 iOS Backup & Restore
 iOS WhatsApp Transfer
 iOS FoneTrans
 MobieSync
 Android Data Recovery
 Broken Android Data Extraction
 Android Data Backup & Restore
 iPhone Unlocker
 Best Samsung Phone Unlock Tool
 Android Unlocker
 Win/Mac Data Recovery
 iDATAPP Screen Recorder
 2D&3D Video Converter
 AI Video Converter
 Ai Blu-ray Player
  Video Repair Software Ai
iDATAPP Video Repairer can help fix/restore videos with lost or corrupted data.
Mac Data Recovery After Factory Reset|Steps by Steps
Learn how to recover Mac data after factory reset using deep scan recovery, Time Machine backups, and iCloud restoration, plus expert tips for preventing permanent file loss on modern macOS systems.
A Factory Reset on Mac Isn’t Always the End — But Time Matters
You probably didn’t expect your files to disappear forever after a factory reset.
Maybe your Mac became painfully slow, infected with malware, stuck in a boot loop, or you planned to sell it and accidentally erased important data before creating a backup. Factory resetting a Mac often feels like pressing a giant “start over” button. Unfortunately, many users realize too late that photos, Final Cut projects, PDFs, notes, or even years of work vanished with the reset.
Guide List
- Why Mac Data Can Sometimes Survive a Factory Reset
- Method 1 — Recover Mac Data with iDATAPP Data Recovery
- Method 2 — Restore Mac Files from Time Machine Backup
- Method 3 — Recover Files Using iCloud and Synced Services
- A Hidden Problem Many Mac Users Face After Factory Reset: System Corruption and Virus Damage
- 5 Frequently Asked Questions
The good news? In many situations, Mac data recovery after factory reset is still possible.
But there’s one critical detail most websites ignore:
The success rate depends heavily on what happened after the reset.
If you immediately continued using the Mac, installed new apps, or copied files onto the disk, the old data may have been overwritten. However, if the storage sectors remain untouched, recovery chances are surprisingly high.
This guide explores practical, real-world recovery methods that actually work for modern macOS systems, including:
- Apple Silicon Macs (M1/M2/M3)
- Intel-based Macs
- APFS and HFS+ drives
- Erased internal SSDs
- Time Machine recovery
- Professional deep scan recovery
Instead of generic advice, we’ll focus on why each method works, when it fails, and how to maximize your recovery rate.
Why Mac Data Can Sometimes Survive a Factory Reset
A factory reset usually removes file references rather than instantly destroying every file block on the disk. Think of it like removing a library index while the books are still physically sitting on shelves.
macOS formats drives differently depending on the system version:
- APFS (modern Macs)
- HFS+ (older Macs)
In both cases, deleted data may remain recoverable until overwritten.
However, SSD-based Macs introduce an additional complication:
TRIM Technology
Modern Macs use SSD optimization called TRIM. After deletion or formatting, macOS may actively erase storage blocks to improve performance. This reduces recovery success over time.
That’s why the first rule is:
Stop using the Mac immediately after realizing the mistake.
Now let’s move into the actual recovery methods.
Method 1 — Recover Mac Data with iDATAPP Data Recovery
For users without a usable backup, deep scanning software is usually the fastest and most effective approach. One of the strongest advantages of modern recovery tools is their ability to reconstruct deleted file structures from raw disk sectors instead of relying only on existing directory information.
The recovery process becomes especially useful after accidental formatting, APFS partition deletion, corrupted startup disks, or incomplete macOS reinstalls.
Unlike basic undelete utilities, professional recovery engines analyze fragmented file signatures, rebuild metadata, and detect hidden recoverable partitions that macOS no longer displays.

A practical option for this situation is: iDATAPP Data Recovery
The software supports recovery for:
- Photos
- Videos
- Documents
- Logic Pro files
- Final Cut libraries
- Emails
- ZIP/RAR archives
- External drives
- Formatted APFS volumes
Step-by-Step Recovery Guide
Step 1 — Install the Software on Another Drive
Avoid installing recovery software onto the erased Mac partition itself. Use:
- External SSD
- USB drive
- Secondary partition
This prevents overwriting recoverable data.
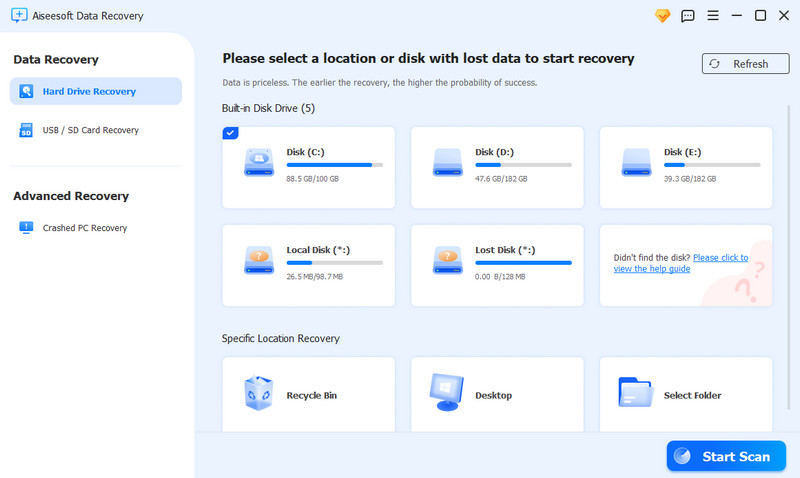
Step 2 — Launch the Program
Open iDATAPP Data Recovery and select:
- Internal Macintosh HD
- External formatted drive
- Lost partition
Step 3 — Start Deep Scan
Choose “Deep Scan” instead of quick scan.
Deep scanning searches:
- Deleted metadata
- Lost file headers
- Fragmented storage blocks
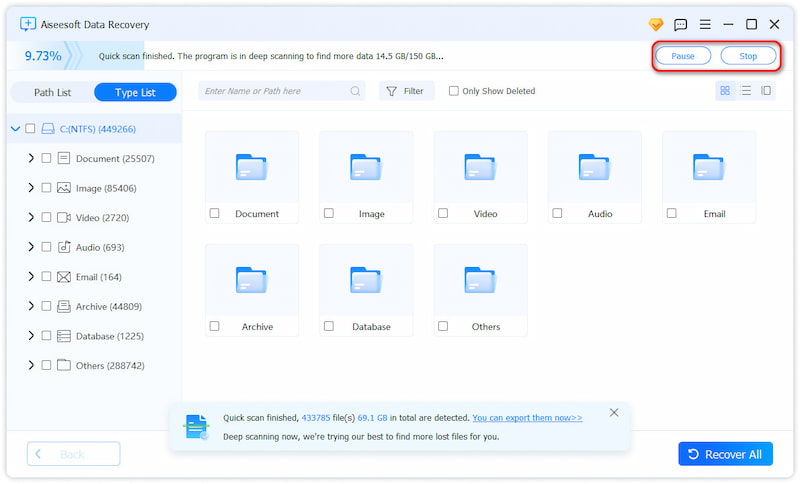
Depending on drive size, this may take 20 minutes to several hours.
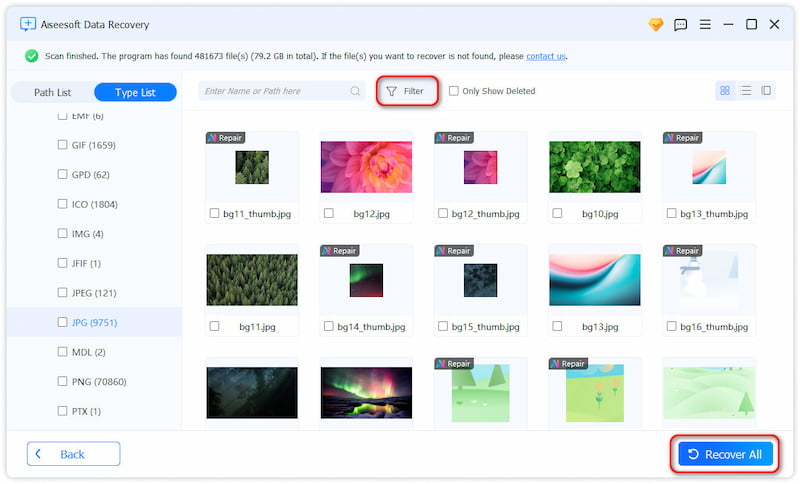
Step 4 — Preview Recoverable Files
The preview feature helps verify:
- Image quality
- Video integrity
- Document readability
Prioritize recovering critical files first.
Step 5 — Export to Another Storage Device
Never save recovered files back onto the original formatted disk.
Use:
- External SSD
- NAS storage
- Cloud drive
Important Notes
- APFS SSD recovery success decreases rapidly after continued Mac usage.
- File names may occasionally disappear after severe formatting.
- Large video files often recover better with deep scan mode.
Method 2 — Restore Mac Files from Time Machine Backup
Time Machine remains one of the most underestimated features inside macOS. Many users enable it once, forget it exists, and later discover it silently saved their entire system history.
If your factory reset occurred after Time Machine had already created backups, recovery becomes dramatically easier and safer than raw disk scanning.
This method works particularly well for:
- Family photos
- Desktop files
- Application settings
- Documents
- Full user profiles
Unlike forensic recovery, Time Machine restores original folder structures and filenames exactly as they existed before the reset.
How to Restore Data from Time Machine
Step 1 — Connect the Backup Drive
Attach the external drive containing your Time Machine backup.
Step 2 — Enter macOS Recovery Mode
For Apple Silicon Macs:
- Shut down the Mac
- Hold the power button
- Choose “Options”
For Intel Macs:
- Restart
- Hold Command + R
Step 3 — Select “Restore from Time Machine”
Inside macOS Utilities, choose:
- Restore from Time Machine Backup
Step 4 — Choose Backup Date
Select a backup created before the factory reset.
Step 5 — Begin Restoration
The Mac will:
- Rebuild accounts
- Restore applications
- Recover files
- Reinstall previous settings
Method 3 — Recover Files Using iCloud and Synced Services
Many Mac users forget that factory resetting a Mac does not automatically erase cloud-stored data.
If iCloud synchronization was enabled before the reset, your missing files may still exist online even after local storage disappears.
This method is often overlooked because users focus entirely on disk recovery while their files are quietly sitting inside:
- iCloud Drive
- Photos
- Notes
- Contacts
- Desktop sync folders
Cloud recovery works best for:
- Personal documents
- Apple ecosystem users
- Recent projects
- Notes and reminders
How to Recover Mac Files from iCloud
Step 1 — Sign into the Same Apple ID
After resetting the Mac:
- Open System Settings
- Log into your Apple account
Step 2 — Re-enable iCloud Sync
Navigate to:
- iCloud
- iCloud Drive
- Photos
- Desktop & Documents
Enable synchronization again.
Step 3 — Wait for Resynchronization
Depending on internet speed and storage size:
- Small libraries restore within minutes
- Large photo collections may require hours
Step 4 — Check Recently Deleted Folders
Visit:
- iCloud.com
- Photos > Recently Deleted
- iCloud Drive > Recently Deleted
Apple temporarily stores deleted items for recovery.
Notes
- If “Optimize Mac Storage” was enabled previously, many files may already exist safely in the cloud.
- Deleted iCloud data has retention limits.
- Some synced applications restore settings automatically.
A Hidden Problem Many Mac Users Face After Factory Reset: System Corruption and Virus Damage
Interestingly, factory resets are often triggered by deeper issues rather than simple user mistakes.
One common example is malware infection.
Many users notice symptoms like:
- Endless spinning beachball
- Random pop-ups
- Browser redirects
- Encrypted files
- System instability
- Sudden storage loss
Eventually, frustration leads them to erase the entire Mac.
But here’s the problem:
A factory reset doesn’t always solve underlying storage corruption.
In some cases:
- Damaged sectors remain
- File system tables stay unstable
- Important files disappear during reinstallation
- External devices become unreadable
This is where recovery and repair tools become important before total system failure occurs.
For example, users experiencing accidental deletion or storage corruption after malware attacks often rely on:
iDATAPP Data Recovery
The software is useful not only for factory reset recovery but also for:
- Virus-related file loss
- Corrupted APFS partitions
- External hard drive failures
- Crashed macOS systems
- Unexpected startup issues
- SD card recovery
- USB flash drive recovery
One overlooked advantage is the ability to recover partially damaged media files that macOS itself cannot open anymore.
Why Malware-Related Data Loss Is Different
When malware affects a Mac, the problem usually extends beyond deleted files.
Viruses may:
- Rename extensions
- Damage directory structures
- Lock documents
- Hide partitions
- Interrupt write operations
Traditional copying methods fail because the file system itself becomes unstable.
Deep scanning recovery tools analyze raw binary signatures instead of depending entirely on the damaged directory structure. This increases the chance of recovering:
- RAW photos
- MOV videos
- PSD design projects
- Office documents
- Audio sessions
Prevention Matters More Than Recovery
After successful recovery, consider these long-term strategies:
- Enable automatic Time Machine backups
- Store duplicate backups externally
- Avoid downloading cracked software
- Keep macOS updated
- Monitor SSD health regularly
Many factory reset disasters begin with ignored warning signs weeks earlier.
5 Frequently Asked Questions
1. Can Mac data still be recovered after erasing the disk?
Yes, in many cases. If the storage sectors haven’t been overwritten or fully TRIM-erased, recovery software or backups may still restore the files.
2. Does APFS make recovery harder?
Sometimes. APFS encryption and SSD TRIM features can reduce recovery success rates, especially after continued usage following the reset.
3. Is Time Machine better than recovery software?
If a backup exists, yes. Time Machine preserves original file structures and is safer than forensic recovery scanning.
Final Thoughts
Recovering Mac data after a factory reset can feel impossible at first, especially when years of files suddenly disappear. Fortunately, modern recovery methods are far more advanced than most users realize.
Whether you use deep scanning software, Time Machine backups, or iCloud synchronization, the key is acting quickly before overwritten sectors permanently destroy recoverable data.
The best recovery strategy is always prevention:
- Maintain regular backups
- Use cloud synchronization
- Monitor drive health
- Avoid unnecessary formatting
And if disaster still happens, the right recovery approach can often bring your lost Mac data back.
 English
 Nederlands
 Tiếng Việt
 日本
日本 Español
 Português
 Deutsche
 Français
 Italiano
 Norsk
Norsk Suomalainen
 Svenska
 Dansk
Dansk Ελληνικά
 Türk
Türk русский
 हिंदी
हिंदी தமிழ்
தமிழ் Bahasa Melayu
 ไทย
ไทย 한국어
한국어 Română
 Polskie
 қазақ
қазақ Gaeilge
 繁體中文
繁體中文